hello all..
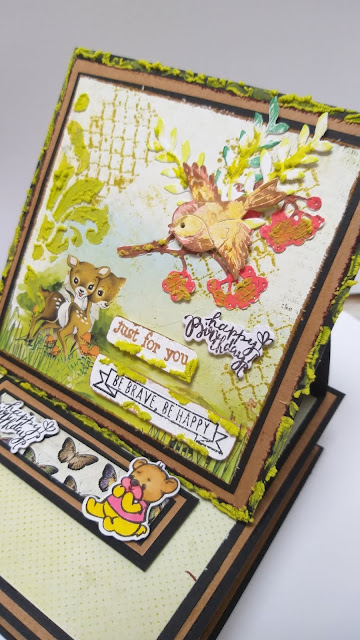
Today I am back with one of my most liked art and that is nothing but PAPER CRAFT!! Yes, today I will present you a beautiful easel card with a drawer box. And I am sure you will all love that (fingers crossed)!! Here is glimpse of my today's project:

Moving on, I will try to share with you how I make this with brief steps done and also list of supplies used. So, let's begin:
Supplies Used:
Black Cardstock ( Prika's)
Brown Cardstock ( Prika's)
Patterned Paper (Papericious)
Hanging metal Charm
Few die cuts and embellishments
Embossing paste (Itsy Bitsy)
Now after gathering all the products to be use, we will start the process for making this project:
A. First of all, I cut the cardstock in required measurements. I am providing you the list and number of cardstock to be cut.


Today I am back with one of my most liked art and that is nothing but PAPER CRAFT!! Yes, today I will present you a beautiful easel card with a drawer box. And I am sure you will all love that (fingers crossed)!! Here is glimpse of my today's project:

Moving on, I will try to share with you how I make this with brief steps done and also list of supplies used. So, let's begin:
Supplies Used:
Black Cardstock ( Prika's)
Brown Cardstock ( Prika's)
Patterned Paper (Papericious)
Hanging metal Charm
Few die cuts and embellishments
Embossing paste (Itsy Bitsy)
Now after gathering all the products to be use, we will start the process for making this project:
For Making cover of drawer box:
B. After cutting all the above mentioned paper and cardstock in the required measurements, we will move towards creation. For that, first we will start from making the cover of the drawer and cut after scoring the cardstock, cut the squares as shown in pictures below:
- Black Cardstock - two pieces of 7"X 81/2" ( score three sides at 1 1/2")
- brown Cardstock - three pieces of 51/4" X 11/4"
- patterned paper - three pieces of 4 3/4" X 3/4"
- Black Cardstock - 5" X 1"
- Black cardstock - 8 1/4" X 8 1/4" ( score at 1 3/4" on all four sides)
- Brown cardstock - 5 1/4" X 1 1/4"
- Black Cardstock - 4 3/4" X 3/4"
- Patterned Paper - 4 1/2" X 1/2"
- Black cardstock - two pieces of 6" X 6"
- Brown cardstock - two pieces of 5 3/4" X 5 3/4"
- Black Cardstock - 5 1/2" X 11" ( score at 5 1/2" and then at 8 1/4")
- Brown Cardstock- two pieces of 5 1/4" X 2 1/2"
- Patterned paper - two pieces of 5" X 2 1/4"
- Patterned paper - one piece of 5 1/4" X 5 1/4"
- Brown Cardstock - 5 1/4" X 5 1/4"
- Black Cardstock - 5" X 5"
- Patterned Paper - 4 3/4" X 4 3/4"


C. Now, for making the drawer, we will make cut on vertical lines till the horizontal line on both sides and then glue it keeping the flaps inside.
D. After completing both drawer cover and box, it will look as follows:

E. For making easel card, we will take easel card base and decorate front as per your choice after pasting brown cardstock and pattened paper on black cardstock. Here is my final look of the project done by me:


Hope you all liked it!!
Your comments are quite valuable for me...
I am submitting this project for two ongoing challenges:

What an amazing post you have here for the challenge. Do add the Prika's challenge badge for a legit entry.
ReplyDeletethanks... done..
DeleteLovely layout for easel card Sudha....thank you for sharing your project with us for our ongoing blog challenge- Anything Goes-Popped Up...
ReplyDeletethank u so much
DeleteBeautiful project!!
ReplyDeleteThank you for joining us at Papericious!!
Thanks
DeleteBeautiful!
ReplyDeleteThankyou for sharing your dimensional project with us in the Papericious September Challenge!
Greeting from Neha (Papericious-DT)
absolutely brilliant!
ReplyDelete